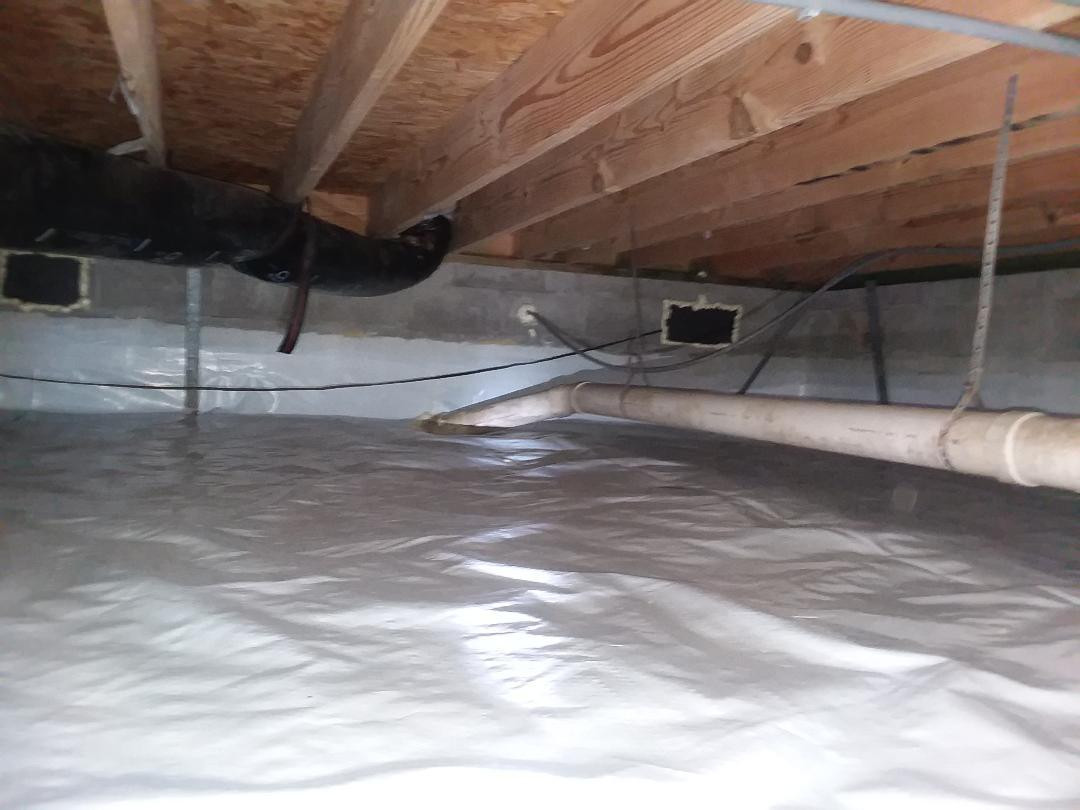
Vapor barriers play a crucial role in maintaining the structural integrity and indoor air quality of residential homes. These barriers are designed to control moisture movement within wall assemblies, floors, and ceilings, preventing damage and promoting a healthy living environment. This article delves into the significance of vapor barriers, their types, installation methods, and best practices, ensuring that homeowners understand their importance in residential construction and renovation.
Understanding Vapor Barriers
What is a Vapor Barrier?
A vapor barrier is a material used in construction to impede the movement of water vapor through walls, floors, and ceilings. These barriers are typically made from plastic, foil, or other impermeable materials. They are essential in preventing moisture from penetrating building assemblies, which can lead to structural damage, mold growth, and decreased insulation efficiency.
The Role of Vapor Barriers
Vapor barriers are integral to a home’s building envelope, contributing to:
- Moisture Control: Preventing moisture from migrating through walls, floors, and ceilings, reducing the risk of condensation and mold growth.
- Energy Efficiency: Improving the thermal performance of insulation by preventing moisture from entering and degrading the material.
- Structural Integrity: Protecting building materials from water damage, which can lead to rot, warping, and other structural issues.
- Indoor Air Quality: Reducing the potential for mold and mildew growth, which can negatively impact respiratory health.
Types of Vapor Barriers
Vapor barriers come in various forms, each suited for different applications and climates. Understanding these types helps in selecting the appropriate barrier for your home.
Class I (Impermeable)
Class I vapor barriers are highly impermeable, allowing less than 0.1 perm (a unit of measurement for vapor permeability). Common materials include:
- Polyethylene Sheets: Typically 6 mil or thicker, used in walls, floors, and ceilings.
- Foil-faced Insulation: Used in walls and roofs, providing both insulation and vapor control.
- Vinyl Wall Coverings: Used as a finish in interior spaces, particularly bathrooms and kitchens.
Class II (Semi-permeable)
Class II vapor barriers have a permeability rating between 0.1 and 1.0 perm. Materials include:
- Kraft-faced Insulation: Common in batt insulation, used in walls and attics.
- Coated Papers: Often used in exterior sheathing and roof assemblies.
Class III (Permeable)
Class III vapor barriers allow more vapor passage, with permeability between 1.0 and 10 perms. They are often used in areas where some vapor diffusion is acceptable:
- Latex Paint: Applied to interior walls, providing minimal vapor resistance.
- Gypsum Board: Used in wall and ceiling construction, offering some vapor control.
Selecting the Right Vapor Barrier
Choosing the appropriate vapor barrier depends on several factors, including climate, building design, and specific area requirements within the home.
Climate Considerations
Different climates demand different vapor control strategies:
- Cold Climates: In cold climates, vapor barriers are typically placed on the warm (interior) side of the insulation to prevent indoor moisture from condensing within wall cavities. Class I or II barriers are commonly used.
- Hot, Humid Climates: In hot climates, barriers are placed on the exterior side to prevent outdoor humidity from infiltrating the building envelope. Class I or II barriers are suitable.
- Mixed Climates: In regions with both hot and cold seasons, vapor barrier placement can vary, and semi-permeable barriers (Class II or III) may be used to allow for some vapor diffusion.
Building Design and Usage
- Basements and Crawlspaces: These areas benefit from Class I barriers to prevent ground moisture from entering the living space.
- Bathrooms and Kitchens: High-humidity areas require effective vapor barriers, often combined with good ventilation.
- Attics and Roofs: Proper ventilation combined with Class II or III barriers helps manage moisture without trapping it within the roof assembly.
Installation Techniques
Proper installation of vapor barriers is crucial to their effectiveness. Here’s a step-by-step guide to installing vapor barriers in different parts of a residential home.
Walls
- Preparation: Ensure the wall cavity is clean and dry. Install insulation if not already present.
- Placement: Unroll the vapor barrier and cut it to fit the wall height. Position the barrier on the warm side of the insulation.
- Securing: Staple the barrier to the wall studs, ensuring it covers the entire surface without gaps. Overlap seams by at least 6 inches and seal with appropriate tape.
- Finishing: Install drywall or other wall finishes over the vapor barrier.
Floors (Crawlspaces and Basements)
- Surface Preparation: Clean the floor surface, removing any debris or sharp objects.
- Barrier Placement: Roll out the vapor barrier, covering the entire floor area. Extend the barrier up the walls by at least 6 inches.
- Sealing: Overlap seams by 12 inches and seal with tape. Attach the barrier to the walls using fasteners and seal the edges.
- Finishing: For basements, install a subfloor and flooring material over the vapor barrier.
Ceilings and Roofs
- Preparation: Ensure the ceiling or roof cavity is clean and dry. Install insulation if necessary.
- Placement: Position the vapor barrier on the warm side of the insulation (typically the attic floor or the interior side of the roof).
- Securing: Staple the barrier to the ceiling joists or rafters, overlapping seams by at least 6 inches and sealing with tape.
- Finishing: Install ceiling drywall or other finishes over the vapor barrier.
Windows and Doors
- Preparation: Ensure the area around windows and doors is clean and free of debris.
- Barrier Installation: Apply a self-adhesive vapor barrier tape or membrane around the window or door frame.
- Sealing: Ensure all edges are firmly attached and sealed to prevent moisture infiltration.
- Finishing: Install trim or other finishes over the barrier.
Common Mistakes to Avoid
To ensure the effectiveness of vapor barriers, avoid these common mistakes:
- Incorrect Placement: Installing the barrier on the wrong side of the insulation can trap moisture and cause damage.
- Incomplete Coverage: Gaps and holes in the vapor barrier can allow moisture to penetrate, undermining its effectiveness.
- Improper Sealing: Failing to properly seal seams and edges can lead to moisture leakage.
- Using the Wrong Type: Selecting an inappropriate vapor barrier for the climate or application can lead to moisture problems.
Vapor Barrier Maintenance
Maintaining vapor barriers involves regular inspection and prompt repair of any damage:
- Regular Inspections: Check vapor barriers during seasonal maintenance to ensure they remain intact and functional.
- Repair Damage: Immediately repair any tears, holes, or other damage with appropriate sealing materials.
- Monitor Humidity: Use dehumidifiers and proper ventilation to maintain optimal indoor humidity levels, reducing the risk of condensation.
Benefits of Proper Vapor Barrier Installation
When properly installed and maintained, vapor barriers offer numerous benefits:
- Enhanced Durability: Protects building materials from moisture damage, extending their lifespan.
- Improved Comfort: Reduces drafts and improves thermal insulation, enhancing indoor comfort.
- Energy Efficiency: Prevents heat loss and reduces energy costs by maintaining effective insulation.
- Healthier Living Environment: Minimizes the risk of mold and mildew, promoting better indoor air quality.
Vapor barriers are a critical component of residential construction, particularly in areas prone to moisture-related issues. By understanding the different types of vapor barriers, their appropriate applications, and proper installation techniques, homeowners can effectively manage moisture levels, protect their property, and enhance living conditions. Regular maintenance and vigilance are key to ensuring the long-term effectiveness of vapor barriers, making them a worthwhile investment for any home. Whether you are building a new home or renovating an existing one, incorporating vapor barriers into your construction plans is essential for a durable, comfortable, and healthy living environment.
Contact the Professionals at Ohio State Waterproofing Today! 330-467-1055


